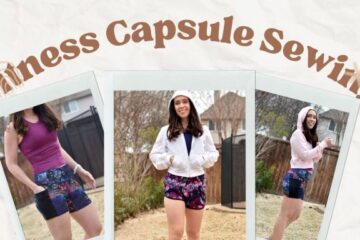
Hello friends! I have been working with some of my favorite fabrics and have a new outfit to show you today. I want to talk about the sweater that almost was not and how all pants need pockets (and I will show you how to do that!). I hope you get some fall vibes and feel cozy, happy, and inspired when you are done reading my post.

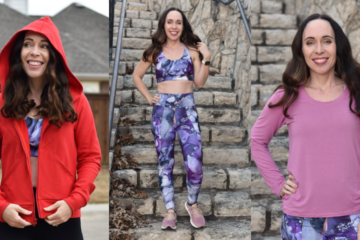
Here is the cliff notes version of what I made: (1) Inspire tights* + Brassie Pockets* + new FREE contoured Waistband Add on* (2) Open Back Pullover*, and (3) Power Sports Bra* with Nursing Option.
Here is the cliff notes version of the fabric I used: (1) The Styled Magnolia Elixir Athletic Brushed Polyester and (2) an open weave sweater knit from my stash.
Now let’s get into the juicy details…
The Tights
I was sent a yard of this AMAZING athletic brushed polyester (ABP) from The Styled Magnolia to sew, and I was beyond excited. Their athletic brushed poly is one of my favorite bases to make leggings out of. I always grab my leggings made form this fabric first out of the wash. They are warm and soft to the touch and have the perfect amount of spandex to keep your tights looking good throughout the day.
I used the Inspire tights pattern* as my base. The only downside to this pattern is that it doesn’t include pockets that you can stuff your hands into so I added the pockets from the Brassie joggers, and it was the easiest most perfect match!

The Pockets
This is how I added the pockets. I cut my front leg pieces according to the Inspire tights pattern. Then, I needed to cut my pocket opening on the front of the Inspire tights so I laid my Brassie front leg pattern piece on top of the pieces I just cut out, and I cut out the pocket opening according to the Brassie pattern. It is not an exact match, but it is so close that it works out wonderfully. Just make sure to leave your pieces mirrored so you make the same opening for each side.
Next, I hemmed the pocket opening the exact same way I would on my Brassies. Finally, I cut out pockets using the Brassie pocket pattern piece. I used wonder tape to attach them to the front and sewed the pocket piece to the front of the pants using a honeycomb stitch on my regular sewing machine. Voila! Easy pockets.

If you want to watch me sew the pockets, I sewed the Brassie pockets during the jogger sew along last week. You can find the pocket blogpost here and watch the video here.
You can apply the exact same method to other bottom patterns that have a side seam. I have done this before on Yoga pants that didn’t have pockets included in the pattern. You can see that post here.

The Waistband
The waistband I used is a new free Greenstyle contour waistband pattern that will match with any of Greenstyle’s athletic tights patterns. It is a contoured waistband that holds very well without the use of elastic. The pattern includes a high rise and ultra high rise.
I cut the high rise in my measured size (using my natural waist measurement), and it feels so good and secure!! I did not need to use elastic in the waistband of these tights or make any adjustments, and these stay up so well!

The Sports Bra
I wear the Power Sports Bra* All. The. Time. Seriously, it fits so well and holds me all together like a regular bra, except I can jump around and exercise in it. So, I just wear it all day and fit my workout in whenever I can.
When I was trying to decide which options to make for this set, I landed on the U Back. I notice that of all the bras I have made, I wear this style the most for some reason. I think it is also the easiest to make because you aren’t adjusting the straps in the back for placement to make sure they are even, and I felt really crunched for time when I made this one.

Since I made the nursing option, it was really easy to adjust the straps in the front before I sewed them down. I usually end up needing to take at least 2 inches out to get the support I need in the bra. I also use bra cups from Amazon, and they make such a difference in avoiding uni-boob.

The Sweater
I made this Open Back Pullover about a month ago, and I gotta be honest… I just was really unhappy with it when I finished. I tried it on, and then, I left it in a pile of things to revisit later. I had envisioned a low drapey open backed sweater so I used this loose and open weave sweater knit remnant I had found in my sewing room closet when I was tidying it up one day. I thought it would be perfect for my vision. I only had a yard so I had to piece part of the back (so nevermind that extra seam under the back yolk!)

So, where did I feel I had gone wrong?
(1) I hemmed the back instead of binding it, and I didn’t account for just how OPEN the low back would be. It was a bit more ummm open than I had planned. I really like the hemmed opening look better, so on my next open back, I will add in the hem allowance before hemming since the pattern is intended for binding.

(2) I used the lower neckline, and it was waaaay low in this sweater knit. The drape and loose weave just made that neckline seem to grow. I added 1/4 inch clear elastic and topstitched the seam down so that it doesn’t grow further, and now, it is stable. BUT, it is still a little low if I wear the shoulders where they are intended to be worn.

Now you are probably wondering why I am wearing this sweater in a blogpost if I was so disappointed in it at first… Well, when I finished my bra and pants, I was looking for something to wear with them, and the sweater was just staring at me. Begging for another chance.

So, I tried it back on, wore it around the house some, nursed (very easily!!) in it, and felt all the FALL VIBES. I noticed the sleeves are AMAZING in sweater knit. The sleeves are loose and cozy (which is really trendy right now anyways). The looseness of the sleeves is due to the way the sweater knit hangs.
When worn off the shoulder, I absolutely love the top and it makes that lower neckline worth it!

I wonder if why I was initially so disappointed was really because it was 100 degrees the day I first tried it on?? Either way I am so glad I didn’t chuck this!! I think when our temps turn even cooler, I will wear a tight fitting tank under it so that my back doesn’t get too chilled, but for our mild temperatures right now, it is perfect. What do you think? Would you wear this open back sweater?

Are you loving the print on this fabric? This print is on preorder through November 3rd. Even though I am very partial to the athletic brushed poly base, it is also being offered on cotton lycra, luxury cotton, french terry, swim, rayon challis, and bamboo! You can find the preorder here.
Thanks for stopping by today! I would love to stay connected with you. You can find me on Instagram. If you want to take a look into the things that inspire me, you can follow me on Pinterest. You may also follow my blog with Bloglovin.
*Disclosures
This post may contain affiliate links, which means I receive a small compensation when you purchase via my link. This does not cost you anything, and I genuinely appreciate the support. Any and all opinions expressed are still my own.
XO


2 Comments
Greenstyle Leggings Sew Along – Day 2 – Sweet Mama · October 4, 2020 at 2:24 pm
[…] The Inspire tights do not come with a pocket, but I have added one and talk about it in this post. […]
A Pink Greenstyle Studio to Street Hoodie and Blue Floral Inspire Tights – Sweet Mama · November 12, 2019 at 7:42 pm
[…] pockets to this pair by using the Brassie joggers patterns pocket. I talked about how I did that in this post. I am still saving up for a coverstitch machine so I used the honeycomb stitch on my regular sewing […]