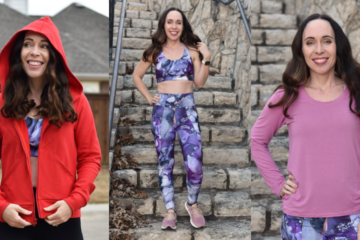
Are you looking for the best leggings pattern to make your butt look amazing? Well, good news – I have found it!

So, at this point, are you thinking, “Girl, you naturally just have a great butt so this is not fair.” Well, I don’t and here is proof. This is a side-by-side of ME on the exact same day, just 10 minutes apart.

Just in case you think it is because of the way I am standing, here is another angle.

Same butt. Same girl. Different leggings. Same pose. What do you think?
The Pattern
The Greenstyle Lift leggings include sizes B – M (which covers hips ranging from 32 to 62 inches). They have no side seam and no pockets and are quick to sew leggings. As the name indicates, their purpose is to give you extra LIFT.

The pattern includes two rise options. I did the highest option on this pair, and the top of my waistband hits pretty much at my natural waist (maybe even a little above it!). The option lower than this one would hit around my belly button.

To achieve the scrunching in the back, you use elastic. My favorite sewing method for this is to sew the back seam with a serger like normal. Then, I took 1/4 inch braided elastic and stretched the elastic to the absolute limit of its ability and sewed it down with a zig zag while stretching it like crazy. I just left mine on the roll and did not cut a specific amount to do this. You can use clear elastic here, but I found that braided elastic worked better because I could stretch it further. The more you can stretch the elastic, the more scrunch you can achieve.
 Then, to lock in my scrunch that the elastic created, I took a piece of ribbon and sewed it down on top of the elastic WITHOUT stretching that seam. Let it stay scrunched up when you sew on your ribbon. I used a straight stitch on my sewing machine and put it directly over the elastic I had just sewn on. You can use anything that is stable here like twill tape. Here is the ribbon I found in my stash that worked. I used the skinniest one I could find that wasn’t bulkier than my seam allowance. You can see what my seam looks like also on both sides. In summary: (1) serger first, (2) add elastic, (3) add ribbon on top.

You can choose between a regular line or an accentuated fit line on the back seam when you are cutting your Lift leggings pattern out. The accentuated line will give you even more scrunch that cups your butt even more and sits more inside than this one. I used the regular line on my leggings.
In addition to the scrunching, the V shape of the back also really adds to the look and helps everything on your back side look nice and full. Do you need help sewing a nice and crisp V? I have a video showing you how. The waistband is the exact same as the Tempo Tights, and I show how to do those beginning at 47:42 in this video.

Fitting and Adjustments
I made a size C on the Lift pattern for the waistband, hips, and thighs. I am at the top of this size (my hips are 35 inches). Then, I removed 1.25 inches at the first shorten/lengthen line and graded to D underneath that. Then, at the calf accommodation area on the pattern, I graded to an E. At the bottom of the calf, I removed another 1.25 inches. I am 5’2″ with larger calves and a 26 inch inseam to my ankle.
Fabric
I used a brushed supplex from The Fabric Fairy. I also used this fabric for the cami I blogged about here last week. The fabric you choose will also make a big difference in how these lift. You really don’t want an overly compressive fabric that quickly snaps back or it will resist staying scrunched up. The stretchier the better for this pattern. The honeycomb style fabric is the type that this pattern was drafted for. I have already ordered some from Greenstyle and can’t wait for it to come in the mail so I can try it out. (I got the pink and mauve!)

You can purchase the Lift leggings here.
Wondering about my undergarments that help make this look possible AND comfortable? The No Show Brief pattern in Mist fabric is what I am wearing underneath my leggings. You can watch me sew this pair here.
I hope I have inspired you in today’s post! I would love to stay connected with you. You can find me on Instagram. You can subscribe to my YouTube channel HERE. If you want to take a look into the things that inspire me, you can follow me on Pinterest. You may also follow my blog with Bloglovin.
Disclosures
This post may contain affiliate links, which means I receive a small compensation when you purchase via my link. This does not cost you anything, and I genuinely appreciate your support. Any and all opinions expressed are still my own.

0 Comments